Thursday, December 3, 2009

Curried Butternut Squash Soup

This is another squash soup recipe I found and tried and both Chris and I like it better than the other squash soup recipe I've already posted (though we liked that one a lot too). This one just has a kick to it thanks to the curry powder and we're big curry fans at our house so we of course like it!

I think I might have gotten this recipe from the Thanksgiving Point calendar mailers they send to me...though I can't quite remember if that's where I found it or not. I've kept the recipe mostly the same except I decreased the amount of olive oil and maple syrup by half.

Curried Butternut Squash Soup
1 medium butternut squash, peeled and diced
1/8 cup olive oil
pinch salt and pepper
1 medium yellow onion, diced
1 tbsp butter
3 cups chicken stock (or 3 cups water plus vegetable or chicken base or bouillon cubes)
1/2 cup heavy whipping cream (or coconut milk or evaporated milk)
pinch nutmeg
pinch ground cloves
1 tsp curry powder
1/8 cup maple syrup

Preheat oven to 350 degrees.

Toss diced squash with olive oil, salt and pepper in large bowl. Spray PAM on a large baking sheet and spread squash in an even layer and roast in the oven at 350 degrees for 10-15 minutes or until lightly browned.

While squash is roasting, place diced onion in a pot with butter and cook over medium heat until onions are almost clear.

Add chicken stock to pot and then the roasted squash and boil until the squash is tender.

Place in a blender and puree until smooth. * (I recommend doing 1/2 of the soup at a time and make sure you loosen the middle part of the lid on the blender to let the pressure caused by the heat out - I usually cover it with a paper towel once I loosen the center piece).

Return to large pot and add the nutmeg, ground cloves, curry powder, maple syrup and cream. Simmer until hot and combined.

Top with Parmesan cheese and roasted pepitas (roasted pumpkin seeds) if you have them and serve with breadsticks, in bread bowls, etc.

*Note: I like to puree 1/2 to 2/3rds of the soup and then mash the rest that's left in the pot with a potato masher. This gives the soup a little texture.*Note: You can of course substitute grated cheddar cheese for the Parmesan cheese, but like with the other squash soup Chris likes it with the Parmesan cheese better.

Sunday, November 15, 2009

Yummy Cinnamon Rolls

I got this recipe from my sister in law Traci. The cinnamon rolls are nice and light and fluffy just the way I like them. The original recipe calls for using dry active yeast, however I've been using instant yeast for everything lately so I've made that change. I also can't eat cinnamon rolls without a cream cheese icing so I've added that as well!

The last time I made them I gave some to a friend in the ward and she's been wanting the recipe, so I figured I'd better get it on here as that was over a month ago. I didn't take a picture at the time so I'll have to add it the next time I make them!

Yummy Cinnamon Rolls

2 cups milk slightly scalded (little skim on top, barely bubbling around edge)
1/2 cup shortening
1 cup sugar
2 tsp salt
1 cup instant mashed potatoes cooked (2/3 cup milk, 2/3 cup flake. I don't add salt, butter, etc)
1 1/2 tbsp instant yeast (I use SAF instant yeast and love it) or 2 tbsp dry active yeast
1/2 cup warm water
2 eggs, slightly beaten
7 - 8 cups flour (add more if needed to get right consistency)

4 tbsp softened butter divided in half
1 cup sugar and 4 tsp cinnamon mixed and divided in half

Directions:
Make instant potatoes.

In Kitchen Aid or large bowl, pour the scalded milk over the next 4 ingredients. Cool until lukewarm (approximately 15 minutes).

If using the instant yeast:
Combine 4 cups of flour and the instant yeast in a medium bowl and set aside.

When cooled, add the water, the eggs and 4 cups of the flour (with the yeast in it) to the Kitchen Aid bowl / large bowl. Beat until smooth. Then add the rest of the flour and mix until dough becomes smooth and elastic.

If using the dry active yeast:
Dissolve yeast in the warm water while the above ingredients cool, during last 5 minutes or so.

When cooled, add the eggs and 4 cups of the flour to the Kitchen Aid bowl / large bowl. Beat until smooth. Then add the dissolved yeast and the rest of the flour and mix until dough becomes smooth and elastic.

The rest of the directions are the same despite what yeast you use:
Place dough in a lightly oiled (PAM) bowl and cover with saran wrap and a dish towel and raise until doubled (at least 1 hour). Divide dough in two and roll out each half into a rectangle (about 10-12" by however long it rolls out).

Soften 2 tbsp butter and brush on the rolled out dough. Sprinkle with half of the sugar/cinnamon mixture (1/2 cup sugar and 2 tsp cinnamon).

Roll down 10" side and cut approximately 1" slices with thread or dental floss (slide the thread under the roll and pull it up on the sides and cross to cut).

Put on greased cookie sheet and let rise until doubled (30 min-1 hr.)

Repeat for the other half of the dough.

Bake at 350 degrees for 20 mins or until lightly browned. Add cream cheese icing while cinnamon rolls are hot.


Cream Cheese Icing
8 oz cream cheese softened
1/2 cup butter softened
3 cups icing sugar
3 tsp milk
1 tsp vanilla

Note: the original recipe called for this glaze, but I'm all about a cream cheese icing instead so that's what I always use!

Glaze
2 cups powdered sugar
8 tsp milk
2 tbsp soft butter
1/2 tsp vanilla

Enjoy!

*Note: I hope this makes sense...but if you have questions about the method for the instant yeast versus the dry active yeast please ask me!

Tuesday, November 3, 2009

European Bread

This bread is super super easy... you don't even have to knead it. The only catch is you have to plan ahead as it needs to rise for 10 - 15 hours plus 1 more hour. So you'll most likely want to start it late the night before and finish it the next day.

I took it to a Relief Society dinner tonight and I was asked for the recipe, so here it is girls! (It really is easy, though might sound a little different, so please let me know if you have any questions.) I think I'm going to try adding some rosemary and garlic next time and I'll update the recipe if it turns out to be a success;)

*Note: I cooked the bread in the picture a little longer than I'd planned (that's what happens when you're trying to do too many things at once) so it's a little darker than I like!

European Bread
6 cups flour
1 tbsp salt
1/2 tsp SAF instant yeast
3 1/4 cups water

Using a big spoon mix all ingredients together, but be careful not to overmix. Mix only until the flour has absorbed all the water (maybe 20 stirs). You will still be able to see some flour that's not quite mixed in.

Cover with saran wrap and let it sit at room temperature for 10-15 hours. Do not let the dough sit for more than 15 hours.

Prepare a cookie sheet with parchment paper and four circles of corn meal or wheat hearts (hot cereal).

Sprinkle flour generously on the counter and scrape dough out of the bowl with a spatula letting it plop on the counter. Cut the dough into 4 portions and then gather up the sides of the dough to a stem (kind of like a balloon). Put flour on your hands and flop it over onto the cookie sheet. Cover with saran wrap and let it rise for 1 hour.

Preheat oven to 500 degrees. Put the cookie sheet in the oven and turn the temperature down to 450 degrees. Bake for 35 minutes or until brown (golden brown is not dark enough).

Remove bread from the oven and let it cool completely before covering it (or the crust will turn soft).

*Note: Do not let the dough rise for more than 15 hours!

*Note: Make sure to use parchment paper and NOT wax paper as the wax paper will not hold up to the high heat.

Thursday, October 29, 2009

Pumpkin Chocolate Chip Muffins

Yes it's another pumpkin recipe...what can I say it tis the season for pumpkin!

This is another recipe from my sister Rebekah.

And sorry for the bad pic...I mistakenly put them in my silicone muffin tin without a liner and I had the hardest time trying to get them out in one piece, so I decided I was just going to have to take a picture of them still in the tin.


Pumpkin Chocolate Chip Muffins

1 cup butter or margarine, softened
2 1/2 cups sugar
3 eggs
14 oz pumpkin (1/2 a large 29 oz can)
1 tsp vanilla
3 cups flour
1 1/2 tsp salt
1 tsp baking soda
1 tsp baking powder
1 tsp cinnamon
1 tsp nutmeg
12 oz bag of milk chocolate chips, or raisins or pecans *optional

Preheat oven to 350 degrees.

In a large bowl or Kitchen Aid, cream the butter or margarine, then add in the sugar and cream well. Beat in the eggs then add the pumpkin and vanilla and mix well.

In a separate bowl, combine the flour, salt, baking soda, baking powder, cinnamon and nutmeg. Add the dry ingredients to the wet ingredients and mix well.

Add in desired amount of chocolate chips, raisins, or pecans.

Line muffin tins with liners and spray Pam on the top of the muffin tin (helps with removing the muffins from the tin). Fill the muffin cups almost full if you like a nice big crunchy muffin top or a little less full if you don't want a big muffin top.

Bake for approximately 20 - 30 minutes (depending on how full you filled your muffin cups) until toothpick inserted comes out clean.

Note: the fuller the cups, the more the muffin top will spread on the top of the tin, if that makes sense!

Note: You can also make this into pumpkin loaves, bake time will be approximately 60-65 minutes.

Enjoy!

Sunday, October 25, 2009

Pumpkin Cookies

This is one of my sister Rebekah's recipes. I haven't made them for years, but as I've been wanting to make some pumpkin recipes for weeks I finally made them last week! I ended up taking them all the Church for my Relief Society lesson so I didn't a picture, but I will next time!

Pumpkin Cookies
1 cup margarine or butter, softened
1 cup white sugar
1 cup brown sugar
2 eggs
1 tsp vanilla
2 cups of pumpkin (14-16 oz can of pumpkin) **
2 tsp baking powder
1 tsp baking soda
1/2 tsp salt
4 tsp cinnamon
1 tsp nutmeg
1/4 tsp ground cloves
3 cups flour

1 bag of milk chocolate chips (12 oz bag)

Preheat oven to 375 degrees.

Cream together the margarine/butter and sugars in a large bowl / KitchenAid. Then add the eggs and vanilla and cream till well mixed. Then add the pumpkin and mix well. In separate bowl mix the dry ingredients together, then add the dry ingredients to the wet ingredients and mix until well mixed. Add the chocolate chips and mix well by hand.

Spoon onto ungreased non stick cookie sheets (if not non stick, then spray PAM on the cookie sheet).

Cook for 15 minutes. Let sit for a few minutes before removing to a wire rack to cool.

*Note: Makes approximately 2-3 dozen cookies, depending on size of cookies.

*Note: You want the cookie batter super thick, so you might want/need to add a little extra flour. The cookies should be nice and thick (almost like a mini muffin) when they're done baking. If they flatten too much you'll want to add a little more flour!

**Note: If you have a large can of pumpkin (29 oz) that you'd like to use you can double the recipe.

Enjoy!

Thursday, October 22, 2009

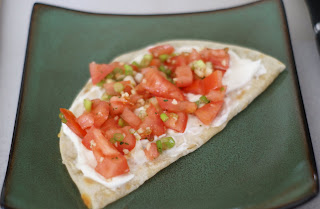
Easy Cheese Quesidilla Appetizer

This is super easy and surprisingly yummy! I had the idea while trying to make a quick lunch one day. I was making a simple cheese quesidilla and saw some left over brushetta topping in the fridge and thought it would probably taste good on top...I was right...it's delicious!

So this is very simple and not too much of an actual recipe as I don't use exact amounts, but to help give you a bit of an idea I've guesstimated amounts here to make 2 quesidilla's.

Easy Cheese Quesidilla Appetizer

2 un-cooked flour tortillas (or cooked flour tortilla)
3/4 - 1 cup cheddar cheese, grated
2 tbsp sour cream
1/2 large tomato, diced
1-2 green onions, chopped
1 tsp olive oil, approximately
1 tsp minced garlic
pinch of salt

Dice the tomato, green onions and mix together with olive oil, minced garlic and salt. Let mixture marinate while making the quesidilla.

Cook one side of the tortilla over medium heat in a large frying pan. Flip it over and sprinkle grated cheddar cheese on half of the tortilla, then fold the tortilla in half. Cook the tortilla for a few minutes and then flip it over and cook the other side. Remove the tortilla to a plate and spread a thin layer of sour cream on the tortilla and then put the tomato mixture on top.

*Note: The amount of tomatoes, green onions, olive oil, garlic and salt will depend on the amount you'd like to make. The mixture will keep well in the fridge for a couple of days if you'd like to make extra and then use it as needed.

Enjoy!

Sunday, October 18, 2009

Butternut Squash Soup

A friend of Chris's made this soup at work for one of their potluck Sunday lunches and Chris liked it so much he brought some of it home for me. I was happy because it's delicious!

The original recipe was from RecipeZaar, I made a few small additions.

Butternut Squash Soup


1 tbsp olive oil
1 heaping tbsp minced garlic (or 1 clove fresh garlic, minced)
1/2 large onion, chopped
1/2 of a large butternut squash, peeled, seeded and cubed (about 1 1/2 lbs or 5 cups of cubed squash)
1 large carrot, diced
1 tsp ground dry sage (or 1 tsp fresh sage, chopped)
pinch of rosemary leaves
1/2 tsp salt
1/8 tsp pepper
3 cups vegetable or chicken broth (or 3 cups water plus veggie/chicken bouillon or base)
Parmesan cheese to garnish (or shredded cheese)

*Note: I just ran out of ginger and nutmeg, but if I had any I think I might add a pinch of one or both of these in the soup as well. Maybe in place of the rosemary leaves and maybe in addition to.

Add oil, garlic and onion to a large pot and saute over medium heat for 3-4 minutes.

Add sage, rosemary leaves, (ginger, nutmeg,) salt, pepper, broth, squash and carrots and bring to a boil. Cover, reduce heat and simmer for 20 minutes, or until squash is cooked through.

Remove from heat and puree in blender (puree half or all of the soup, depending if you'd like to have any chunks remaining in the soup).

Return to medium heat and continue to cook for a couple minutes before serving.

Serve garnished with cheese and fresh sage if desired.

Serve in bread bowls, with fresh breadsticks, etc.

Enjoy!

*Note: This recipe makes about 8 cups of soup, so if you want a nice big pot to feed a lot of people you'll want to double it and use a large butternut squash!

Hot Fudge Sauce

So I've been a slacker and haven't posted a recipe in over a month...I've got lots saved in my drafts, but I just haven't gotten to posting any of them. But since I've been seriously obsessed with this hot fudge sauce for the last couple weeks I thought it was only fair to share the wealth and post the recipe!

I have been searching for a good hot fudge sauce recipe since I started making "The Bomb Brownies"...I've tried a few, but haven't been happy with them, then I remembered reading this post and I decided to try it.

The original recipe called for Carnation Evaporated Milk, but since I didn't have any and it was late at night and we just had to have hot fudge sauce on our vanilla ice cream I decided to improvise! I'm going to have to make it with the evaporated milk to see which one I like better, but let's just say I'm LOVING it just the way I made it...in fact I can't get enough of it and I've been craving it every day since - so much so that I had to run to the store to get some store bought ice cream when we ran out of the good stuff! Sadly it's not as good with the store bought ice cream, but I'll take what I can get;)

Hot Fudge Sauce
1 1/2 cups of butter (3 sticks for those of us in the US of A)
1 1/2 cups of whipping cream (or 1 - 12 ounce can of Carnation evaporated milk)
1 tsp vanilla
3/4 cup + 2 tbsp cocoa
7 1/2 cups powdered sugar (or 2 lb. bag of powdered sugar)

Combine the butter, whipping cream & vanilla in a saucepan and cook on medium heat until butter is melted. Then add the cocoa & icing sugar & mix well on low heat. Once it is mixed well (meaning you can get rid of as many of the little chunks as you can), pour it into a blender and puree it for a good 3-4 minutes. If all the little chunks haven't disappeared, puree it for a couple more minutes. (Beware not to fill the blender too full as the heat of the sauce will increase the pressure in the blender and if it's too full the top may pop off and make a huge mess...so you may just want to puree it in two batches to avoid this. Chris also suggested not putting the lid on too tightly as that will let the pressure escape, but I'm too nervous the lid will pop off to try this method and just stick with doing 1/2 batch at a time.)

Serve over vanilla ice cream...homemade is definitely the best;)

Note: I like it made with the whipping cream better!

Enjoy!

Friday, September 11, 2009

Eggplant Parmesan

So Chris first made this for me for Valentine's dinner this past Valentine's. I was quite impressed he came up with making Eggplant Parmesan for me and then even more impressed with how much I loved it! In fact, I've been thinking about making it a lot lately, I just need to remember to get more eggplant!

Instead of your traditional Eggplant Parmesan, this is a little different as it's layered almost like lasagna...and actually the last time I made it I had the idea to add a cottage cheese layer the next time I make it. I added it this time and it was delicious! Feel free to omit the cottage cheese layer if you like;)

Eggplant Parmesan
1 large eggplant, peeled and thinly sliced
3 eggs, beaten
1 1/3 cups Italian seasoned bread crumbs, approximately (I don't measure but just use as much as needed)
3 1/2 cups Rose sauce, (you can also use regular spaghetti sauce, but we prefer the rose sauce), approximately
1 1/2 - 2 cups shredded mozzarella cheese, approximately (again I don't measure but use as much as needed)
3 tbsp Parmesan cheese, approximately
1/8 tsp dried basil

Optional cottage cheese layer:
16 oz cottage cheese
1 egg

Preheat oven to 350 degrees F.

Dip eggplant slices in beaten egg, then in bread crumbs. Place in a single layer on a baking sheet that has been sprayed with PAM. Bake in the preheated oven for about 10 minutes on each side.


In a 9x9 inch baking dish (that has been sprayed with PAM) cover the bottom of the dish with a thin layer of spaghetti sauce. Then place a layer of eggplant slices in the sauce and sprinkle with the mozzarella and Parmesan cheeses. Repeat the sauce, eggplant, cheese layers, ending with the cheeses on top. Sprinkle basil on top.


Optional cottage cheese layer:
Add a layer of the cottage cheese mixture sprinkled with a little mozzarella cheese in place of one or two of the cheese layers.

Cover with tin foil and bake for 35 minutes. Then remove the tin foil and bake for another 10 - 15 minutes or until golden brown.


*Note: If you don't slice the eggplant thinly enough you might want to bake the dish for an extra 10-15 minutes, as you want to make sure the eggplant is tender before removing the tin foil and baking for the additional 10-15 mins.

Enjoy!

The "I'm Addicted" Chocolate Cupcakes


My sister Rachel is a professional cake decorator and made these cupcakes for our wedding (the first pic). Chris absolutely LOVED them and was thrilled to find a number of them in the freezer waiting for us when we got home from our honeymoon (thanks to my mum for saving them for him).

I made them for Chris as a surprise on our first Valentine's Day thanks to Rachel sending me the recipe. Then I made them for him again this past Valentine's Day and decided I was addicted to them so they've been a staple in our freezer ever since. (They freeze perfectly, you just pull them out of the freezer about 1/2 hour before you want to eat one and voila...fresh yummy addicting cupcakes).

The funny thing is it's only been since this last Valentine's Day that I've become addicted to them...for some reason I'm way more into chocolate now than I ever used to be. In fact, I think I like them even more than Chris now which I wouldn't have thought was possible.

You can use any chocolate cake recipe for the cupcakes, but since Sarah discovered the Extreme Chocolate Cake recipe that's the only one I use. It really is the best.

The "I'm Addicted" Chocolate Cupcakes

Preheat oven to 350 degrees. Prepare two muffin tins with liners and then spray with PAM. Make the Extreme Chocolate Cake recipe and pour into each muffin cup. The easiest and non-messiest way I have found to do this is to fill up a large 2 or 4 cup measuring cup with the batter and then pour the batter in to each cup. Be sure not to fill each cup more than 3/4 full as they will overflow and spread flat (instead of making a nice round top like most cupcakes/muffins). Cook the cupcakes for 20-25 minutes or until toothpick inserted in middle comes out clean.

Remove cupcakes from the pan and cool on a metal rack. Once cooled, fill with chocolate ganache and then frost with Chocolate Buttercream Icing. Then try to eat just one..I dare you;)

If you're feeling really fancy you can top the cupcakes with strawberries dipped in chocolate (Rachel used Dove dark chocolate, but Chris and I like milk chocolate more than dark chocolate, so I use Dove milk chocolate).


Chocolate Ganache/Truffle Filling
3/4 cup heavy whipping cream (6 oz)
8 oz (8 squares) semi-sweet or dark Bakers chocolate, depending on your preference
1 tsp vanilla
pinch of salt

Chop the chocolate into fine pieces and put in a bowl, along with the vanilla and salt. Heat the heavy cream in a saucepan until hot, but not boiling (you will see bubbles forming just around the edges which will tell you it's hot enough). Pour hot cream over chocolate. Let sit for 30 sec or so and then whisk until the chocolate is melted. Cover and refrigerate until it reaches the desired consistency, approximately 2 -3 hours.

Fill a pastry / icing bag with the ganache and using a decorative tip with a large hole fill each cupcake with some ganache. (You'll use the tip to make a hole in the middle of the cupcake and then insert the tip in to the cupcake about 1/2 inch and squeeze some of the ganache into the hole. You'll know when it's enough as the ganache will start coming out the top.)

*Note: If the ganache is left too long in the fridge and you're unable to squeeze it through the pastry bag, let it sit at room temperature for 10 - 15 minutes and try again. You can also handle the bag a little and it will soften from the heat of your hands.

*Note: If filling 24 cupcakes you will most likely have a little ganache left over. No worries, you can keep it in the fridge and eat it with a spoon;) Or spread it on graham crackers or of course use it in another recipe. However, if you're a little more conservative in how much ganache filling you put in to each cupcake you can get away with halving the recipe: 3 oz heavy whipping cream, 4 oz (4 squares) semi-sweet or dark Baker's chocolate, 1/2 tsp vanilla, smallest amount of salt.

Chocolate Buttercream Icing

4 cups icing sugar
1/2 cup butter
1/2 cup shortening
1/2 - 3/4 cup cocoa powder (depends on how chocolate-y you want it) or 3 oz unsweetened chocolate squares, melted
1 tsp vanilla
3-4 tbsp milk (just enough to get to the right spreading consistency)

In a large bowl or Kitchen Aid, cream together shortening and butter with electric mixer. Add cocoa powder and vanilla and beat till smooth. Gradually add sugar, one cup at a time, beating well on medium speed. Scrape sides and bottom of bowl often. When all sugar has been mixed in, icing will appear dry. Add milk and beat at medium speed until light and fluffy.

Fill a pastry / icing bag with the icing and then using whatever decorative tip you'd like, frost the cupcakes.

*Note: Keep bowl of icing covered with a damp cloth when not in use.

*Note: Icing should be refrigerated in an airtight container when not in use and can be stored for up to 2 weeks. To use after icing has been refrigerated, return to room temperature and re-whip.


The Bestest Carrot Cake...yum, yum


Ok, so I've been craving and wanting to make Carrot Cake forever...well maybe not forever, but for a very very very long time. Don't ask me why I haven't done it before today, because I seriously love it...and with the cream cheese icing...yum, yum as Winnie the Pooh would say (can you tell we watch a lot of Winnie the Pooh at our house?).

This recipe is an old one from when I was living at home, with some changes of course... like the brown sugar (as I really liked how it worked in the Zucchini Bread a couple weeks ago), the pineapple (as I love it in the Best Banana Bread recipe) and then of course substituting half the oil with applesauce.

Carrot Cake

4 eggs
1 cup vegetable oil *optional: 1/2 cup oil, 1/2 cup applesauce
1/2 cup milk
1 cup white sugar
2/3 cups brown sugar
2 tsp vanilla
2 1/4 cups flour
2 tsp baking powder
2 tsp baking soda
1/2 tsp salt
2 generous tsp cinnamon
1/4 tsp nutmeg
1 cup (8 oz can) crushed pineapple, juice drained *optional
3 cups shredded carrots
*optional: 1 cup chopped nuts (pecans, walnuts, etc)

Preheat oven to 350 degrees. Prepare desired pans (2 - 9 " round or square) by spraying with PAM and covering with a light layer of sugar.

Beat the eggs, oil (and applesauce), milk, sugar and vanilla together until well combined.

In a separate bowl add the flour, baking powder, baking soda, salt, cinnamon, nutmeg and stir together then add the dry ingredients to the wet ingredients and beat until well combined.

Add in the pineapple and shredded carrots and mix thoroughly.

Bake for 40-45 minutes until toothpick inserted in comes out clean. Cool cakes for approximately 10 minutes before removing the cakes from pans and then cool completely.

Frost the cake after it has cooled completely.

*Note: I made one 9 " square pan and then 6 large cupcakes today. The cupcakes take approximately 25-28 mins to cook.

Cream Cheese Icing
8 oz Cream cheese or Neufchatel cheese, softened
1/2 cup butter, softened
1 tsp vanilla
4 cups icing sugar

Cream the cream cheese, butter and vanilla together until smooth, then add in the icing sugar one cup at a time and beat in between each cup until smooth and fluffy.

*Note: Just beware this is quite sweet with the icing... in fact I almost couldn't finish the piece shown in the picture above. So go small and then go back for seconds if you like, or don't put as much icing on;)

Enjoy!

Sunday, August 23, 2009

Delicious Crumb Topped Zucchini Bread

Ok, this is absolutely delicious! Seriously folks, it really is that good! In fact Jacob (who's 16 months old) can't get enough of it...he whines for some whenever he sees it and when you give him one bite he keeps whining for more...it's that good!

We've had lots of zucchini around the house lately (thanks to Aimee) and I've been wanting to make zucchini bread for days and finally got to it today. I didn't have a recipe, so I spent some time searching on Allrecipes and then did a little experimenting and I have to say I'm thrilled with the result.

Crumb Topped Zucchini Bread

3 cups flour
1 tsp salt
1 tsp baking soda
1 tsp baking powder
3 tsp cinnamon
1/4 tsp nutmeg
3 eggs
1/2 cup vegetable oil
1/2 cup applesauce
1 1/4 cups sugar
1 cup brown sugar
3 tsp vanilla extract
3 cups grated zucchini, undrained

1 cup crushed pineapple * optional
1 cup chopped walnutes*optional (I didn't add them)


Crumb Topping
1/2 cup regular oats
1/2 cup brown sugar
1/4 cup flour
1/4 tsp cinnamon
1/4 cup butter, softened


Preheat oven to 325 degrees. Grease and sugar (or flour) two loaf pans.

Stir together flour, salt, baking powder, baking soda and cinnamon in a bowl.

Beat the eggs, oil, applesauce, vanilla and sugar in a large bowl or KitchenAid. Add the dry ingredients and beat well.

Stir in the zucchini (and pineapple and nuts if desired) until well combined.

Pour batter into prepared pans and put them in the pre-heated oven.

While the bread is cooking, combine the ingredients for the crumb topping.

Bake the bread for approximately 20-25 mins then add the crumb topping and cook an additional 35 to 50 minutes, or until toothpick inserted in the center comes out clean*.

*Note: This is an extremely moist bread, so the toothpick won't come out completely clean, but you will be able to tell the difference in the toothpick between when it's not done and done.

*Note: Cool completely before attempting to cut this baby...as I said it's really moist so it's difficult to make a clean cut when it's still hot.
You can cool it on a wire rack and / or remove the bread out of the pans after it's cooled for 1/2 hour or so to speed up the cooling process.

Enjoy!

Creamy Spinach Pesto Pasta

I'm not really sure what to say about this dish except that I was in the mood for a creamy spinach type pasta dish and decided to try to make a pesto sauce out of spinach. I did a google search for spinach pesto and found a recipe on Rachael Ray that helped give me a little direction and voila, this recipe was born. It's a really yummy variation of regular pesto...if you like pesto that is;) And if you want a little lighter or healthy version you could of course leave out the whipping cream (though I wouldn't dare of course).


Creamy Spinach Pesto Pasta
salt
3/4 - 1 lb pasta (whichever kind you would like)
4 cups fresh spinach (packed lightly)
handful of chopped pecans
1/2 cup vegetable / chicken stock
1/2 cup grated mozzarella cheese
a few sprinkles fresh or dried nutmeg
zest of 1 lemon
juice of 1/2 lemon
3 tbsp olive oil, approximately
2 tbsp garlic, minced or 2-3 fresh cloves
1/2 onion, diced
1 cup whipping cream
1/2 medium zucchini, chopped, *optional
artichoke hearts, drained and chopped, *optional
chicken breasts or tenders, *optional

Cook noodles to al dente, making sure not to overcook as you will combine them with the sauce and they'll continue to soften at that point.


While the pasta is cooking, prepare the spinach pesto by combining the spinach, pecans, vegetable stock, nutmeg, lemon zest and lemon juice and a few sprinkles of salt in a blender or food processor. Pulse to chop everything up and then add approximately 2 tbsp olive oil and continue pulsing to combine.

Place a large skillet over medium heat and heat 1 tbsp olive oil. Add the diced onion, minced garlic and chopped zucchini and cook until the veggies are done (if you're like me, you like them to have a little bit of a crunch to them still, but otherwise cook them till they're nice and soft). If you're using marinated artichoke hearts you can add them once the veggies are almost done as they won't need to cook as long as the onions and zucchini.

Once the veggies are done add the whipping cream and heat to boiling, allowing the sauce to boil for 2-3 minutes.


Then add the pasta, pesto, mozzarella cheese and salt to taste and toss to combine. If adding chicken, then chop up cooked / poached chicken breasts / tenders and add at this point. Serve warm with an extra sprinkle of mozzarella cheese on top.


You can also put it in a casserole dish and top with mozzarella cheese and broil/bake it for a few minutes if you like a nice cheese layer on top of your pasta.

Enjoy!

Monday, July 6, 2009

Hamburger Buns

We had AJ and Sarah over for dinner on the 4th of July and of course had hamburgers. Sarah asked if the hamburger bun recipe was on the blog yet and as it wasn't I promised I'd get it on soon...so here it is! I know this is only adding to the BBQ kick on here lately, but hey, at least they're really good!

I got this recipe from my mother in law and was happy as I'd just been thinking about finding a recipe to make hamburger buns. It was originally for 12 and I've halved it.

Hamburger Buns
1/2 cup milk
1/2 cup water
1 tbsp butter
1 1/2 tsp white sugar
3/4 tsp salt
2 3/4 cups flour
1 1/8 tsp SAF instant yeast (or half a .25 ounce packet of rapid rise active dry yeast)
1 egg yolk
1/2 tablespoon water

Combine milk, 1/2 cup water, butter, sugar and salt in a saucepan. Bring to a boil. Remove from heat and let stand until lukeward, about 110°F (if the mixture is too hot it will kill the yeast).

In a large bowl, stir together the flour and yeast. Pour the wet ingredients into the flour mixture and stir until the dough starts to pull together. If using a Kitchen Aid or stand mixer, use the dough hook to mix for about 8 minutes. If not, knead the dough on a floured surface for about 10 minutes.

Place the dough in a greased bowl, turning to coat. Cover with Saran Wrap and a dish towel and let stand until doubled in size, approximately 40 mins to 1 hour (again I usually heat the oven up to 175°F and then turn it off and let the dough rise in the warm oven).

Punch down the dough and divide it into 6 portions. They should be a little larger than a golf ball. Make tight balls and place them on a baking sheet lined with parchment paper or aluminum foil. Let them sit for 5 minutes.

Oil/PAM your hand and then flatten each ball with the palm of your hand until it is 3 to 4 inches wide. Cover rolls and let sit until they double in size, about 20 minutes.

Preheat the oven to 400 °F. Mix together the egg yolk and 1 tbsp of water in a cup or small bowl and brush onto the tops of the rolls.

Bake for 10 to 15 minutes or until nicely browned.

Makes 6 buns.

*Note: Chris loves putting grilled onions on his burgers and I have to say they've become an absolute necessity on my veggie burger too! So yummy!!! Avocado is sure good too!

Enjoy!

Sunday, June 28, 2009

Grilled Chicken Marinades

We had a family lunch today to celebrate Chris's birthday and Chris grilled two different kinds of chicken. The first is called Bengal BBQ chicken and is served at Disneyland. Chris said he just asked for the recipe and they gave it to him. Lucky for him because he loves it.

Chris said he found the second recipe online somewhere years ago. He doesn't know what it's called so I'm calling it Sprite Chicken.

Bengal BBQ
1 c. soy sauce
1 1/2 c. water
1 tbsp ground black pepper
3 tbsp sesame seed oil
1 tsp ground red pepper
1 tsp cayenne pepper (original recipe only called for 1/2 tsp, but Chris always uses 1 tsp)
1 tbsp fresh garlic
1 tbsp corn starch

Mix all but corn starch. Bring to a low boil over medium heat. Add corn starch to thicken. Marinate in a gallon size ziploc bag for approximately 6 hours. Grill.

*Note: As far as how much chicken this will make, Chris said it's enough marinade for a gallon sized ziploc bag full of chicken.

*Note: This one is on the hotter/spicier side. If you like a little bit of a kick, but not a lot you might want to use only 1/2 a tsp of the cayenne pepper.

Sprite Chicken
1 can Sprite (you can also use 7-Up)
1 cup Soy Sauce
1 tbsp minced garlic (you could also use garlic powder)

Marinate in a gallon size ziploc bag for overnight before grilling.

*Note: As far as how much chicken this will make, Chris said it's enough marinade for a gallon sized ziploc bag full of chicken.

Serve with grilled potatoes, veggies, grilled potatoes with veggies, watermelon (if you're a Parson this is a must), salad, etc.

Enjoy!

Wednesday, June 24, 2009

Grilled Red Peppers

Another BBQ recipe. We had steak for Father's Day and Chris's birthday and of course needed potatoes and then wanted a veggie and since I love red peppers I came up with this. That'll explain the last two posts;)

Grilled Red Peppers
red peppers, seeded and cut into large chunks
olive oil
Montreal Steak seasoning (or whatever seasoning you'd like)


Seed and cut red peppers and place in a ziploc bag along with the olive oil and Montreal Steak seasoning. Rub till the peppers are covered in the oil and seasoning. Using a basket or barbeque griddle. Make sure to watch these carefully as they don't take very long to cook on each side (probably about 5 mins on low).

*Note: You might want to experiment with how much of the seasoning to use, depending on your tastes. I would recommend starting off lightly the first time and then adding more the next time you make them if you'd like. I've made them twice and thought the seasoning was perfect both times.

Enjoy!

Red potatoes on the BBQ


Can you tell we BBQ a lot in the summer? Or that I love potatoes?
These are super duper easy and of course delicious...sorry I say that a lot!
Red Potatoes on the BBQ
red potatoes, washed and sliced
onions, sliced
butter or margarine
rosemary garlic spice
salt
Slice the potatoes and onions and layer in a large piece of tin foil sprayed with PAM. Put pieces of butter on the potatoes and sprinkle with the rosemary garlic spice (or whatever spices you'd like) and salt. Fold up the tin foil and BBQ (of course turning sides) till done.
Serve with a dollop of sour cream.
Serve with steak, chicken, etc.
Enjoy!

Wednesday, June 17, 2009

Chris's Grilled Potatoes and Veggies

Chris has a lot of specialties, but his grilled potatoes and veggies are definitely one of MY favourites! Beware that this is another one of those recipes that is not exact as far as amounts or measurements.


Grilled Potatoes and Veggies
potatoes, washed and cut
large red onion, cut
red, yellow, orange peppers, washed, seeded and cut
zucchini / Italian squash, washed and cut
olive oil/oil
seasonings as desired: rosemary garlic, salt, pepper, etc.

Combine veggies in a bowl with olive oil and seasonings. Put potatoes on a barbeque griddle and cook, flipping as needed to prevent burning. Once the potatoes start to soften, add the veggies and cook together till done.

Serve with BBQ chicken or steak, with a nice dollop of sour cream on the potatoes and veggies of course!

*Note: You can also bake these in the oven at 400 degrees till tender. Start with the potatoes, then add the veggies when the potatoes start to soften.

Enjoy!

Friday, June 12, 2009

Breadsticks

This is the same recipe as the Regular Crust pizza dough.

Breadsticks
3 cups flour
1 tbsp instant yeast (I like SAF Instant yeast)
1 tbsp sugar
1 tsp salt
2 tbsp oil
1 cup hot water

Mix dry ingredients and then add the wet ingredients. If using a Kitchen Aid, mix until the dough becomes smooth and elastic. I usually mix it for a few minutes in the Kitchen Aid and then take it out and finish kneading it by hand. If you are not using a Kitchen Aid, mix the ingredients until combined and then knead the dough on a floured surface until it is smooth and elastic. Add more flour if necessary.Place in a oiled bowl and cover with saran wrap and a dish towel and let rise until it's doubled in size (approximately 20-30 minutes, depending on the temperature of the room).

Hand press into a rectangle type shape and then fold over and cut into strips (about 9-10). I like to twist mine and place them on a pizza stone sprinkled with corn meal. Brush with melted butter or margarine and sprinkle desired spices (we like a little garlic salt and garlic herb or roasted garlic) and parmesan cheese. We often leave them plain and then dip them in garlic dipping sauce. Instead of dipping them in the garlic dipping sauce sometimes I just brush them with margarine as soon as they come out of the oven.

Bake at 425 degrees for approximately 15 mins or until browned on top.

Enjoy!

Homemade Vanilla Ice Cream with Variations

This recipe is from Chris's aunt Mindy. The recipe is to make Caramel Crunch ice cream, but I thought I'd post it as vanilla ice cream since we use the vanilla ice cream base to make all sorts of variations, like caramel crunch, cookies n cream, etc. I think we've also made peanut butter cup with it before too! Oh and I just have to mention that even though it might sound kinda funny mixed berry oreo is SO good.

The difference in this recipe versus the recipe for the berry ice cream is this recipe uses eggs and so Chris says it's more of a custard base... whatever it is it's smooth and creamy and absolutely DELICIOUS!!!

Homemade Vanilla Ice Cream
4 eggs
2 1/2 cups sugar
5 cups whole milk
3 cups whipping cream
2 1/2 tbsp vanilla
1/2 tsp salt

Beat eggs until light. Add sugar and continue to beat until thick. Add the milk, whipping cream, vanilla and salt and mix well. Pour into a 4 quart freezer and place in ice cream maker, surround with ice and rock salt and allow to mix. Check periodically and add more ice as necessary.

*Note: If you only have a 5 or 6 quart machine, then use 6 cups whole milk and 4 cups whipping cream.

**Note: If you are concerned about Salmonella you have 2 options. You can substitute the eggs with an egg substitute such as Egg Beaters (follow instructions on carton). You can also heat the egg/milk mixture to 160 degrees F slowly then cool it quickly in the fridge or freezer.

Mindy's Carmel Crunch
1 jar Mrs. Richardsons Caramel Topping
1bag crushed Skor chips

Follow instructions above, however add 1/2 jar of caramel topping before you turn the ice cream maker on. When freezer slows, add the crushed Skor chips and the rest of the caramel.

*Note: You might not want to use the entire jar or the entire package of the chips if you're using a 4 quart machine.

Mixed Berry
2 cups mixed berries, thawed and mashed

Follow instructions above, adding the mixed berries to the ice cream maker before you turn it on.

Cookies-N-Cream
1/2 - 3/4 bag Oreos, crushed in a ziploc bag (if you buy the monster box from Costco Chris suggests using 2 1/2 sleeves)

Follow instructions above. Once the ice cream maker has stopped turning add the crushed Oreos.

Berry Cookies-N-Cream
1/2 - 3/4 bag Oreos, crushed in a ziploc bag (if you buy the monster box from Costco Chris suggests using 2 1/2 sleeves)
2 cups mixed berries, thawed and mashed

Follow instructions above, adding the mixed berries before you turn the ice maker on. Once the ice cream has stopped add the crushed Oreo's.

*Note: as mentioned above, you can use the basic vanilla recipe and mix in anything you'd like!

Enjoy!

Strawberry Rhubarb Crisp


This is a favourite dessert in the summertime back home. Rhubard grows wild on my parents' farm so I grew up making this dessert a lot. I didn't know they sold it in stores until I saw it in our local Macey's grocery store ad last week...you can bet I bought some and then made it! The funny thing is I was talking to my sister Rebekah the day I made it and she said they'd just had it a couple times in the last week...I told you it's a favourite dessert back home!

Strawberry Rhubarb Crisp
4 large stalks of rhubarb, washed and sliced in 1/2 inch pieces
1 1/2 lbs of strawberries, washed and sliced
sugar

Crisp Topping:
2/3 cup flour
1 cup brown sugar
2 cups rolled oats
1 tsp salt
2/3 cup melted butter

Combine the cut rhubarb and strawberries together with a little sugar and place the fruit mixture in a greased (PAM) 9X13 pan.

Combine the crisp topping ingredients until crumbly and sprinke over the fruit. Bake at 375 degrees for 45-60 minutes or until the topping is cooked and browned on top.

Serve with vanilla ice cream or whipped cream. It tastes absolutely delicious with Chris's vanilla ice cream!
*Note: The amounts of rhubarb and strawberries are approximate as the size of rhubarb stalks and strawberries vary.

*Note: You can substitute apples, peaches, blueberries, etc instead of using strawberries and rhubarb.

Enjoy!

Garlic Dipping Sauce

If you like Papa John's garlic dipping sauce (which at our house we do), then you'll love this! And it doesn't get any easier! It's perfect for breadsticks, or pizza!

Garlic Dipping Sauce
1/2 cup margarine or butter
1/4 teaspoon garlic powder

Partially melt the margarine / butter and then mix in the garlic powder.

*Note: It works really well if you use a container or jar with a lid so you can shake it.

Enjoy!

Pizza Dough

Well I said I'd post our favourite pizza dough recipe and here it is! I've done a lot of testing and experimenting with recipes over the past few weeks and this is the recipe I've come up with that Chris likes the best! (I should mention that this recipe is an adaptation of a recipe that came from Todd and Lori Berrett).

I've listed two separate versions of the recipe, the second is the recipe increased by 1/3rd because Chris likes a lot of crust. We also take a handful of the dough and make Jacob a little personal pepperoni pizza out of the recipe. And as there's more crust I decided to take an idea from Aimee and started putting cheese sticks (divided in half lengthwise) in the crust as well. It's so good. The only problem is with more crust there's also more crust to dip in the garlic dipping sauce;)

Regular Crust Pizza Dough
3 cups flour
1 tbsp instant yeast (I like SAF Instant yeast)
1 tbsp sugar
1 tsp salt
2 tbsp oil
1 cups hot water


Big Crust Pizza Dough
4 cups flour
1 tbsp + 1 tsp instant yeast (I like SAF Instant yeast)
1 tbsp + 1 tsp sugar
1 1/3 tsp salt
2 tbsp + 2 tsp oil
1 1/3 cups hot water

Mix dry ingredients and then add the wet ingredients. If using a Kitchen Aid, mix until the dough becomes smooth and elastic. I usually mix it for a few minutes in the Kitchen Aid and then take it out and finish kneading it by hand, but you can of course let the Kitchen Aid do all the work. If you are not using a Kitchen Aid, mix the ingredients until combined and then knead the dough on a floured surface until it is smooth and elastic. Add more flour if necessary.

Shape in to a ball and lace seam side down in a oiled (PAM) bowl and cover with saran wrap and a dish towel and let rise until it's doubled in size (approximately 30-45 minutes, depending on the temperature of the room).

For the Regular Crust: Sprinkle cornmeal on a large pizza stone / pizza pan and then hand press or roll the dough on to the stone and cover with desired toppings.

Bake at 425 degrees for 15-25 minutes*

For the Big Crust: Sprinkle cornmeal on a large pizza stone / pizza pan and then hand press or roll the dough past the edge of the stone so the dough is hanging off the stone.

Divide 5-6 cheese sticks in half lengthwise and place them along the edge of the pizza stone and wrap the dough that's hanging over the side over the cheese sticks and press in to the bottom crust to hold. Then cover with desired toppings.

Bake at 425 degrees for 15-25 minutes*


*Note: Cooking time will depend on the toppings used. For example, the gourmet vegetarian pizza will take longer to cook, while a pepperoni or bbq chicken will take less time.

*Note: I've also used this dough to make breadsticks and they turned out great. We always dip our breadsticks in garlic dipping sauce (just like Papa John's).

Enjoy!

Thursday, June 11, 2009

Green Bean Dish

I started making this dish a number of years ago - don't ask me where I got the idea from, but I just remember making it all the time when I was single and basically living with Sandra and the girls. Being a fellow veggie lover, Sandra loved it as much as I did. I don't get to make it very often now that I'm married because Chris hates green beans and therefore won't eat it. However, if you like green beans I think it's pretty safe to say you'll like it!

I have to say I thought it was funny that my sister in law, Tamela was talking about a green bean dish at Christmas and when she gave everyone the recipe I realized that though there are a few differences it was basically the same as my green bean dish. I just thought it was funny because I've never heard of anyone else making anything like this before.

Just beware that this is definitely not a very specific recipe as far as measurements go!

Green Bean Dish
green beans (fresh or frozen, I usually use the frozen french style because they're easier to keep on hand and I like the french style the best with this dish)
1 onion, sliced
roasted almonds (sliced or whole)
olive oil
minced garlic
garlic powder
salt
pepper
soy sauce
grilled chicken *optional

Over medium-high, heat olive oil in a frying pan. Add the sliced onions and minced garlic and cook until the onions are about half cooked. Then add the green beans, almonds, salt, pepper, and garlic powder according to your taste. Continue to cook until the onions and green beans are cooked through, however not too much that they're mushy. Serve over rice, and sprinkle with soy sauce, again according to your taste.

*Note: When I make this for other people I add in grilled chicken as well.

*Note: I roast my own almonds by putting them in our little toaster oven for a few minutes. Just be careful not to cook them too long that they get overcooked and / or start to burn. If I'm using whole almonds, I cut them before I roast them.

*Note: The recipe Tamela gave me had a note that said "I also use this for mushrooms, asparagus and zucchini/squash".

Enjoy!

Tuesday, June 2, 2009

Grandma Bickmore's Homemade Berry Ice Cream

Homemade ice cream is a huge Bickmore (and now Parson) family tradition. I always hear stories of the homemade ice cream at Grandma's, especially on Memorial Day when everyone would bring their ice cream maker and make a different kind of ice cream. Chris loves making ice cream any excuse he can get (actually he doesn't even need an excuse!), so it was a no-brainer that he needed to make Grandma's berry ice cream for Memorial Day this year!

I think raspberries must have been Grandma's favourite berry because another favourite family recipe is a Raspberry Cream pie, which I think was from Grandma as well!

Grandma's Raspberry Ice Cream
2 bags frozen raspberries OR substitue any kind of berries you like
2 cups sugar
3 Quarts 1/2 & 1/2 (or 6 cups cream and 6 cups milk)

Mash berries thoroughly in a bowl. Add sugar and mix to dissolve.

Put in 4 quart ice cream maker and fill to the fill line with 1/2 & 1/2.

Cover with rock salt, ice and turn on!

*Note: Chris just eye balls the berries as we buy a big bag of them from Costco, but I googled it and found that a 12 oz bag of frozen raspberries is equal to approximately 3 cups frozen berries. Hope that helps!

Enjoy!

Monday, June 1, 2009

Yummy Cheeseball

This recipe is from dear Sister Banks (her hubby was in our Single's ward bishopric). I had it and knew Chris would love it so got the recipe just before he came home from Iraq and we've been making it ever since. It's been a while since we've had it and he decided he needed to make it last night, so here's the recipe for you all!


Yummy Cheese Ball courtesy of Sister Ann Banks
2 pks cream cheese (softened at room temp)
4 oz (1 small jar) Old English Sharp cheese
1 cup grated mild cheddar cheese
1 tbsp parsley
2 tbsp Mayo (not Miracle Whip)
1/2 tsp onion salt
1/2 tsp garlic powder
1/2 cup chopped pecans

Mix all ingredients (except the pecans) together. Roll into a ball in waxed paper and let set in fridge for approximately 3 hours.

Once the cheeseball is set roll it in the chopped pecans. (To do this we place the chopped pecans in a medium sized tupperware container [the one we use is 6 cups and is kind of a cylinder shape with a rounded bottom]. Then remove the cheeseball from the waxed paper and place it in the tupperware container, put the lid on and gently shake the container until the cheeseball is covered in the pecans.)

Move to a serving plate and serve with your favourite crackers.

*Note: This recipe can easily be cut in half!

*Note: You can switch the onion salt for onion powder and the garlic powder for garlic salt, just make sure not to use both onion salt and garlic salt as the cheeseball will be far too salty! If you're trying to cut out salt then use both onion powder and garlic powder.

Enjoy!

Nanaimo Bars


Nanaimo bars are a Canadian dessert that are extremely popular back home. Legend has it that they were created in Nanaimo, British Columbia (that's in Canada for those out there not so familiar with Canadian geography;)). I absolutely love them and used to love that they're a staple at most functions in Canada. They're hard to explain and are just one of those things you really need to try. Just beware that they are extremely rich so you can't eat a lot of them at once and are therefore best if cut into small squares (think of it as good portion control). There are many different recipes out there, including lots of variations like mint and mocha, but the original is my favourite! This recipe was originally taken from the Nanaimo city website, however has a few very small changes.

Nanaimo Bar Recipe

Bottom Layer
½ cup unsalted butter (European style cultured)
¼ cup sugar
5 tbsp cocoa
1 egg, beaten
1 ¼ cups graham wafer crumbs
½ cup finely chopped almonds or walnuts
1 cup shredded coconut
Melt the first 3 ingredients in the top of a double boiler (you can make your own using a pot and a large glass or stainless steel bowl). Add the egg and stir to cook and thicken. Remove from heat. Stir in the crumbs, coconut, and nuts.

Press firmly into an ungreased 8" x 8" pan and chill in the fridge for 20-30 mins.

Middle Layer
½ cup unsalted butter
2 tbsp and 2 tsp. heavy cream
2 tbsp vanilla custard powder (FYI: If you live in Utah, Bird's custard powder can be found in the local Utah Macey's grocery stores)
2 cups icing / powdered sugar

Cream the butter, heavy cream, custard powder, and icing / powdered sugar together well. Beat until light and fluffy. Spread over bottom layer.

Chill in the fridge for 20-30 mins.


Top Layer
Approximately 4 ounces of milk chocolate (or 4 (1 oz) squares semi-sweet chocolate), chopped
2 tbsp unsalted butter

Melt the chocolate and butter over low heat. Let sit for 2-3 minutes to cool and then pour the melted chocolate over the second layer and chill in the refrigerator.

After approximately 10 minutes remove the bars and score the top layer into the size of squares you'd like (this will ensure your chocolate layer doesn't crack when you cut your squares). Return to the fridge for another 1/2 hour or so.

Remove from the fridge approximately 10 minutes before serving. Cut into squares just before serving.

*Note: These freeze very well. I just put the squares in a ziploc bag and put them in the freezer then take them out a few minuets before we want to eat them!

Enjoy!

Tuesday, May 26, 2009

Gourmet Vegetarian (w/ optional chicken and bacon) Pizza


Papa Murphy's Gourmet Vegetarian pizza is one of my all-time favourite things to eat. There's not many things that I like so much that I'd care to keep eating it even when I'm full, but their pizza is one of those things. I first started making it myself when I was living back home in Canada (because we obviously didn't have Papa Murphy's there). I've started adding chicken to it for Christopher and usually just put it on 1/2-2/3rds of the pizza for him! And just trust me about the lemon juice because it really brings out the flavours!

* Note: Chris just recently started adding bacon to his half as well and now he can't eat it without the chicken and bacon.

Gourmet Vegetarian (w/ optional chicken and bacon) Pizza
Pizza Dough:
use your favourite or see our pizza dough recipe

Creamy Garlic Sauce:
1 cup Hidden Valley Ranch dressing
1 round tbsp minced garlic

This makes enough to cover 2 pizza's.

We use the Hidden Valley Ranch Seasoning and Salad Dressing mix, following the directions to make 8 oz, then add the 1 tbsp garlic.

Toppings:
spinach, fresh is ideal, but frozen (and thawed) works as well
1 zucchini, thinly sliced
mushrooms *optional (Chris hates mushrooms so sadly we don't add them very often)
artichoke hearts, cut in half (I buy the marinated hearts from Costco in the large jar, then rinse and drain as many as I want to use)
1 large tomato, diced (or 2 Roma tomatoes)
1/2 large red onion, diced
2-3 chicken tenders (I usually poach the chicken and then cut them into bite sized pieces), *optional
bacon, cooked and broken in to bite sized pieces *optional
lots of shredded cheese (cheddar, mozzarella, etc)
parmesan cheese

Hand press or roll pizza dough onto large round pizza stoneware sprinkled with corn meal. You can also use a regular pizza pan.

Liberally spread the creamy garlic sauce on the dough. Then cover the dough with a layer of spinach, then a layer of zucchini, followed by a layer of mushrooms, then the artichoke hearts, then the tomato and red onion. If you're adding chicken and/or bacon, I'd suggest putting on here. Top with as much cheese as you'd like, but I suggest lots. You can also add a layer of cheese under all the veggies if you like a lot of cheese on your pizza.

Bake at 425 degrees on the bottom rack for 18-20 minutes, or according to your dough recipe, though please note it will take a little longer to cook due to all the veggies (wet ingredients).

After the pizza comes out of the oven let it sit for a couple minutes before cutting and serving it.

And here's the trick, sprinkle lemon juice and salt on the pizza!
Enjoy!

Monday, May 18, 2009

Masman Curry - Chris's favourite meal!

I was first introduced to Thai food while I was in Thailand with our Wave of Hope project in 2005. I absolutely fell in love with it, especially Pad Thai and Masman curry! Chris took me to a Thai Restaurant on our first date after we got back together (a few weeks after I got back from Thailand) and he also fell in love with Thai food, and Masman curry in particular. I found a little Thai market near where we lived and I've been making Masman curry ever since. If you live in Utah Valley, send me an email and I'll let you know where the market is;)

Masman Curry
100 grams (1/4 of a container of the MAE PLOY Masman curry paste - it works out to be a little less than 1/2 cup)
3 cans of coconut milk, 400 ml each (approximately 5 cups)
1 cup water
5-7 medium potatoes, peeled and diced
1 large onion, diced
2-3 carrots, peeled and sliced
1 cup corn, approximately
2 chicken breasts or 4-5 chicken tenders, cut into bite sized pieces (*optional, you can add tofu or possibly even beef if you'd like, though we've never used beef)
1/2 cup peanuts, chopped
1 tbsp lemon juice
1 tbsp sugar

Stir fry curry paste with 1 can of the coconut milk, once mixed through add the rest of the coconut milk and heat until boiling.

Add the uncooked pieces of chicken and continue cooking, stirring occasionally.

As the chicken is almost done cooking (probably 10-15 mins depending on the size of the pieces) add the potatoes, carrotts, onions and peanuts. Add 1 cup water (you can add more depending on desired consistency) and continue cooking until the vegetables are cooked through.

Add 1 tbsp lemon juice and sugar, and 1 cup of frozen corn. Cook for another 5 minutes and serve over rice! Be sure to taste before seasoning with salt or pepper!

* Note: This is not a really spicy curry (Jacob, who's 13 months old likes it if that tells you anything), however you will want to taste it before serving so you can adjust the flavour if you'd like. For a milder curry, you can add more coconut milk OR if you know you want a milder curry you can use a little less of the curry paste.

* Note: You can use any brand of Masman curry paste, but the one I use is MAE PLOY and it's a product of Thailand! I haven't been able to find Masman curry paste in a regular grocery store here in Utah Valley, but depending on where you live, you might be able to find it. Just know that if you try to use red, green or yellow curry paste it will be a totally different flavour!

Makes approximately 12 generous servings (includes second servings for those like Chris who like seconds).
Enjoy!

Thursday, May 14, 2009

The Bomb Brownies

I'm not the biggest fan of brownies, but for some reason I've been in the mood for them lately and started looking for a good recipe online. The name of these intrigued me so I read the reviews and then decided they were the ones to make! I made two small changes and used milk chocolate chips as they're the only kind we use in our house and just mixed the dry ingredients together instead of sifting them! I also changed the name slightly... As I said I'm not the biggest fan of brownies, but these are very very very yummy!


The Bomb Brownies
1 cup butter, melted
3 cups white sugar
1 tablespoon vanilla extract
4 eggs
1 1/2 cups all-purpose flour
1 cup unsweetened cocoa powder
1 tsp salt
1 cup milk chocolate chips

Preheat oven to 350 degrees. Spray PAM in a 9x13 glass baking dish.

Combine the melted butter, sugar, and vanilla in a large bowl. Beat in the eggs, one at a time, mixing well after each, until thoroughly blended.

Stir together the flour, cocoa powder, and salt in a separate bowl.

Gradually add the flour mixture into the larger bowl and stir until well mixed. Stir in the chocolate chips by hand. Pour the batter into the baking dish and spread the batter evenly with a spatula/bowl scraper.

Bake for 35-40 minutes until a toothpick inserted comes out clean*. Cool on wire rack before serving. Serve with vanilla ice cream and hot fudge sauce.

*Note: I set the timer for 35 minutes and checked them, then cooked them an additional 5 minutes. Clean is a relative term because the toothpick won't come out clean like it would from a cake, but will be a little gooey still as we all know brownies are best a little gooey!

Enjoy!

Crepes

I used to love having crepes, but for some reason with all the other breakfast foods we make we've never made crepes...until this morning when I decided to make them while Chris was still sleeping! I don't remember where this recipe is from exactly, except that it's in my recipe book from when I was a teenager, so it's definitely old school! The nice thing about crepes is the possibilities for filling them are endless. Chris gave me a bite of one of his creations (powdered / icing sugar and a little lime juice sprinkled on top) and it was yummy! But my favourite was a little peanut butter and sliced bananas and then drizzled (as you can see) with some homemade syrup! Wow...although I was full I sure wanted more! I think the only thing I might have liked more was some nutella instead;)

Crepes
4 eggs
1 1/3 cup milk
2 tbsp oil, or melted butter/margarine
1 cup flour
1/2 tsp salt (*optional)
Beat eggs slightly, then add remaining ingredients and beat until batter is smooth. Heat crepe pan or non-stick skillet over medium high heat (approximately 375 degrees). Spray PAM to cover the pan. Using a ladle, pour approximately 1/4 cup of batter into the pan and tip to spread the batter to the edges, making a nice round crepe. You can also use the bottom of the ladel to help swirl the batter outward into a large circle. Once you start to notice some small bubbles on the top and the edges are dry and have turned a light brown flip the crepe over and cook until lightly browned on the other side. Fill crepes with your favourite topping or combination of toppings and serve.

As I said, the possibilities are endless, but here's a few to get you started:
-strawberries, blueberries, peaches, bananas
-peanut butter
-Nutella
-yogurt
-strawberry freezer jam
-sprinke with powdered/icing sugar
-drizzle with caramel, homemade syrup, lime or lemon juice
Makes approximately 8-10 crepes, depending on how big and thick you make them.
*Note: To keep crepes soft and warm until you're ready to serve them, place cooked crepes in a baking dish with a lid or a tortilla warmer inside a 200 degree oven.
*Note: Crepes are supposed to be thin, but if you want them a little thicker, just use a little more batter!
Enjoy!

Friday, May 8, 2009

Æbleskivers

I'd never even heard of Æbleskivers until Chris and I got married. Whenever we go visit his parents in Cali or have family breakfasts together up here his mum knows she needs to make them. They're one of Chris's favourite breakfast foods (he couldn't commit to them being his favourite because let's face it he loves a lot of breakfast foods) and as they take a little longer to make than other breakfast foods we don't make them as often.

If you're wondering what they are, they're basically a Danish pancake in the shape of a sphere. Wikipedia noted that they are a cross between American pancakes and a popover. Chris's mum used to have to get her Æbleskiver pans from Solvang (a city in California that is known for it's Danish bakeries, restaurants, merchants and architecture), but lucky for you, you can get them pretty much anywhere now.

Æbleskivers
2 cups flour
1/2 tsp salt
1 1/2 tsp baking soda
1 tsp baking powder
2 cups buttermilk *
3 eggs, separated
1 tsp vanilla
3 tbsp melted butter

Stir dry ingredients together. Add the buttermilk, egg yolks, and vanilla to the dry ingredients and beat until smooth. Beat the egg whites separately and fold into the batter along with the melted butter.

Heat the Æbleskiver pan over medium high heat and pour a small amount of oil into the bottom of each rounded cavity. Once the oil is hot pour a small amount of batter into each cavity (almost filling each cavity). Use a skewer or fork to flip it over once the bottom is cooked and then cook the other side.

You can also drop little bits of banana, apple, or berries in the middle of each as well while you're cooking them!

They are traditionally served with jam and powdered/icing sugar, however we also serve them with fruit and homemade syrup (as pictured above).

Makes approximately 42 Æbleskivers (6 batches).

*Note: To make 2 cups of buttermilk, pour 2 tbsp lemon juice (or white vinegar) into a measuring cup and add enough milk to make 2 cups. Let it for 5 mins.

*Note: To keep Æbleskivers warm until you're ready to serve them, place them in a baking dish with a lid or a tortilla warmer inside a 200 degree oven.

Enjoy!

Thursday, April 30, 2009

Neiman Marcus Chocolate Chip Cookies

Chris has drill this weekend so I thought I'd make him some cookies as a treat to take with him. He of course wanted these ones as this is his favourite chocolate chip cookie recipe! I have to say it's becoming my fav as well;) The recipe, along with this background information can be found on the Neiman Marcus website: An urban myth is a modern folk tale, its origins unknown, its believability enhanced simply by the frequency with which it is repeated. Our signature chocolate chip cookie is the subject of one such myth. If you haven't heard the story, we won't perpetuate it here. If you have, the recipe below should serve to refute it. Copy it, print it out, pass it along to friends and family. It's a terrific recipe. And it's absolutely free.

Neiman Marcus Chocolate Chip Cookies

Ingredients:
1 cup unsalted butter, softened
2 cups brown sugar
6 tablespoons granulated sugar
2 eggs
4 teaspoons vanilla extract
1 teaspoon baking soda
1 teaspoon baking powder
1 teaspoon salt
3 1/2 cups flour 3
 teaspoons instant espresso powder, slightly crushed (omitted)
1 bag milk chocolate chips (We only use milk chocolate at our house, but the recipe originally called for semi sweet. Sometimes I also use some white chocolate chips as well.)


 Directions
 1. Preheat oven to 350 degrees. Cream the butter with the sugars using an electric mixer on medium speed until fluffy (approximately 30 seconds)
 2. Beat in the egg and the vanilla extract for another 30 seconds.
3. In a mixing bowl, sift together the dry ingredients and beat into the butter mixture at low speed for about 15 seconds. Stir in the chocolate chips.
 4. Drop by large spoonfuls onto a greased cookie sheet. Bake for 8 to 10 minutes, or 10 to 12 minutes for a crispier cookie. (We prefer the soft gooey kind so bake them for about 8 mins.) 

Makes 24 to 30 large cookies. 

 Note: This was a small recipe and we always doubled it, so I've posted the double recipe, so it's easier! 

 Note: The Neiman Marcus website says to bake the cookies at 300 degrees for about 20 minutes or until nicely browned around the edges. Bake a little longer for a crispier cookie. It also says to gently press down on the dough with the back of a spoon to spread out into a 2 inch circle before you bake them.